LinkWithin

Related Posts Plugin for WordPress, Blogger...
Showing posts with label home-made. Show all posts

Friday, February 10, 2012

My Little Valentine

Valentine's Day is one of my favorite holidays. 
Err, scratch that. 
Valentine's Day is one of my favorite holidays to prepare for. 
The actual day itself usually kind of sucks for one reason or another. 
But the hearts and the candy and the flowery centerpieces I love. 
To the cheesy valentines and random acts of love/kindness that the holiday brings about I say "bring it on"!!

I know Elliott is not old enough to "get" it yet, and in fact she doesn't even have any classmates to hand valentine's out to just yet. But, that's okay. I'll use her as a fabulous excuse to whip up some cute little valentine's and I will pass them out to all of my her good friends!

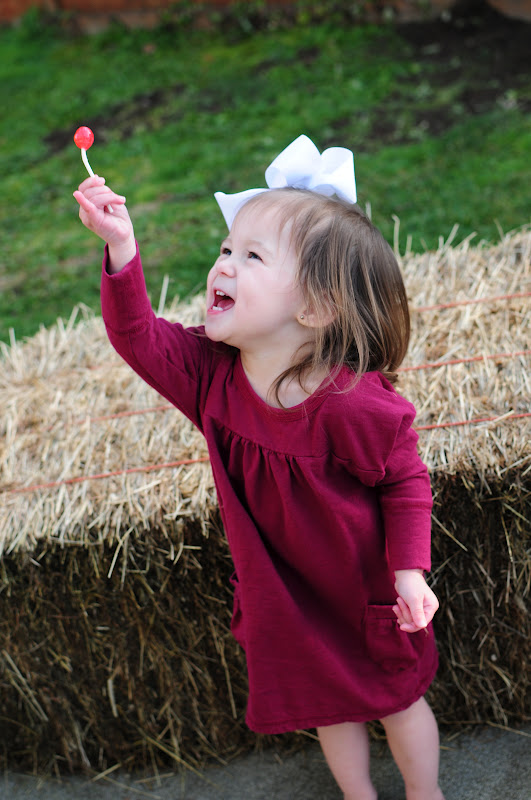
This idea may be SO last year, but I couldn't help myself! I thought that Ellie would be a little more cooperative for these photos, but who was I kidding?! She's two!!
So, without further ado, here are Elliott's Valentines:


I can't wait to hand them out to all of OUR friends next week ;)

And, as promised, here are the rest of the pictures and some outtakes.....all of this for just one picture!!


And finally! We have a winner!! 
It's not the typical pose for this particular valentine, but it was as 
good as it was going to get for us:
I photoshopped out the sucker, and replaced it with a real one. I added the text in photoshop as well, and then printed them out at Costco. I'm so please with how they turned out! 

And now I am curious and in the Valentinesy mood.....so, tell me, what's the most creative valentine you've seen?  

Photobucket

Monday, October 17, 2011

A Whole Lotta Bakin' Going On

Okay, is that post title cheesy enough for ya?!
Hehe! Well, it's my first post after spending an entire weekend working on this blog "behind the scenes". Thanks for sticking around! I'm happy with a much simpler, fresh layout, and while I'm no pro at html and all that jazz, I think I did ok!
So, this was a post I had wanted to write last week, but, well.....time just got away from me!
I did post last week about apple picking, which was so much fun and ended with 30 pounds of yummy apples just begging to be cut up, cored, peeled and used.
Somehow, some way.
So, a lot of baking ensued in an attempt to use up the apples before they went bad
(and some other non-apple baking happened because I had a couple potlucks at work).
First up, apple sauce!
I heard from a friend that you can make apple sauce in a crockpot, and since I'm recently obsessed with my crockpot, this was the first thing I wanted to try.
You guys?! This applesauce was SO good!!
I don't eat store bought applesauce. It's just not something I've ever enjoyed.
But this applesauce is definitely something I crave now!
I really just looked at a few different recipes and decided to just wing it.
Here's what I did:
10-15 apples (our apples were pretty small. just use enough to pretty much fill up yer crockpot.)
(peel and core the apples, then toss in the crockpot in large chunks, adding lemon juice sparingly as you go)
1 cup sugar
1tablespoon cinnamon
splash of vanilla
1/2 cup water
I mixed all of my dry ingredients and poured them over the apples, then I added my wet ingredients.
I gave it all a good stir to coat all of the apple pieces, and let it cook on low for about 8 hours.

I went to stir the apples at the very end, and Scott started to ask if we needed the blender to blend our applesauce. In case you've never made applesauce, the answer to that question is a big fat NO! Seriously, the apples just fell apart and mushed all together to just the right consistency!
Our applesauce was sweet and cinnamon-ey, but if you like yours different then just adjust those ingredients to your liking ;)
Ellie refused to eat it at first, but once she finally gave it a try, it was love at first bite! Mmm Mmmm! I think this will be one of our new favorite treats (and traditions!)

Next up was apple pie. I know a few people who absolutely love apple pie, so I figured it was a good thing to make (and then give away so we didn't have to eat it all!). Again, I eyeballed a couple different recipes and then just went for it! (I don't know what's gotten into me lately.....I've never ever been this comfortable in the kitchen!) I cheated and bought the pie crusts, but I didn't regret it one bit!
Here's what I did:
2 store bought pie crusts, lay on on bottom of pie plate
5-8 apples (I really have no idea, just fill up a big bowl), peeled, cored, and sliced
Sprinkle some lemon juice over the apples
Sugar, cinnamon, vanilla and nutmeg (I just threw in as much as I wanted, and mixed it with the apples until they looked good!)
Pour apple mixture into pie plate
Take "pats" of butter and add randomly to the top of your apple pile
Cover with second pie crust, and seal the edges
"Vent" the top pie crust with a knife (I tried to make a cute apple tree like my mom always does)
Sprinkle some milk on the top crust, and then sugar (this gives your crust a nice glaze)
Bake at 375 for about 45 minutes. Honestly, you'll be able to smell when it's done ;) And the crust should be nice and lightly golden. We let the pie sit for about 20 minutes, and then we dug in and enjoyed it warm! Yum!

And last but certainly not least, I made some Pinterest inspired pumpkin cupcakes to take to work.....and I'm so glad that I took them to work, otherwise I might have eaten them all myself!
I love these because not only are they delicious, but they are just too easy to make!
You'll need:
1 box of cake mix (You can use white, chocolate, or spice....I used spice cake mix this time)
1 can of pumpkin (I think 15 oz is the small can? Yeah, use that)

Mix your two ingredients together, and then bake in cupcake liners,
according to the directions on the box!
That's all!!
Now, I was a little worried that my cupcakes would be more like muffins, so I did add one egg and a splash of oil....but I've heard that it's really not even necessary!
These cupcakes were so moist, and had just the right amount of pumpkin flavor!
I bought some cream cheese frosting to go along with it.
Now you can certainly make your own, but I was all about the easy for this recipe.
I did, however, take that frosting and plop it in a ziploc bag......cut a little bit off of one corner, and then pipe the frosting onto the cupcakes!
That way you get a "homemade" look, with only half of the effort ;)
I'm so glad that I was able to get a little fall baking in last weekend. Because before I know it, I'll be whipping up my favorite Christmas goodies! Ah!

~Amanda

Friday, September 16, 2011

Activity

Lately I've been trying to make a concerted effort to keep Elliott active.
The more activity that is going on, the less likely she is to tantrum or use attention-seeking behaviors (at least, that's what I learned in college anyways).
Also, it's easy for me to leave her to play by herself sometimes.
I get distracted by twitter or Pinterest (my newest obsession), and before you know it, Ellie is throwing herself on the ground crying because who-knows-why because I wasn't paying attention!
Now don't get me wrong, we all want a child who can self-entertain and I am no exception.
But, I also want to have good memories of her childhood, both for me and for her!
Do you know how much you can learn about your child if you simply put down the phone (or the remote, or the laptop, etc) and just PLAY with them?!
I sometimes have to force myself to stop and play with her (it's sad to admit that, but it's true!), but when I do?! Holy cow, my heart explodes with joy, love, and pride! I really don't want to forget those feelings, and I definitely don't want to take my time with Ellie as a toddler for granted
(um, really I don't want to take even one day of her life for granted......)
So, to make the most of things and to get me and Ellie playing together, I've been working on finding fun activities for us! Pinterest has helped a lot with this, and I'll show you why in just a second ;)

First off, I signed Ellie up for a Mommy and Me dance class.
I know what some of you are thinking, because I thought it at first, too.
"Who can afford baby dance classes?!"
Okay, so maybe I'm the only tight-budgeted momma (although I doubt it), but let me tell you a secret: the activities listed in your city or community Parks and Rec department are usually very reasonably priced! I found this dance class (as well as simming lessons and gymnastics classes) for Ellie's ago for super cheap! It's only four weeks long, but I fully intend on signing her up for the next round, and the round after that!
Photobucket
The dance teacher is an instructor at a large dance academy, and we are so lucky to have her teaching this class! We've only gone to two classes, but it's amazing how much Ellie is learning already!
It's not all about first position and pointing your toes at this age. Rather, watching Ellie learn that cleaning up after an activity isn't so bad, and that following directions isn't the end of the world is worth the cost of a little dance class (even if I'm the one dancing and she just stands in the middle of the circle and claps, ha!) She's learning some big lessons, and I'm just so glad that I can be there to see it all unfold!
I'm also trying to get creative with activities at home, too. Thanks to Pinterest, I've got a good start on home-made activities and crafts, most of which are free or super cheap to put together. My first under-taking was sensory tubs.


I came up with the idea a few weeks ago because I wanted E to have a "table activity" for when she finishes dinner before Scott and I, and other times where entertaining her at the table would be nice. I had a bunch of empty rubbermaid bins just sitting in a hall closet, so I decided it was time to put them to use! I filled one with rice, one with pasta, and one with sand (dollar store, baby!) and then put a few toys and/or utensils in each bin.

You could use bigger bins than I did, but that's just what I had on hand.
This size actually works pretty well for this age, because it's not so big that it's overwhelming, and you can easily snap the lid back on and shove it in a cupboard when tiny hands get a little out of control ;)
I was delighted when we finally got to sit down and try out our new activity. I read somewhere that parents often get frustrated with these types of activities because, left unsupervised, most children make a HUGE mess with something like this. So, consider yourself warned! When using sensory tubs (at least for kids ages 3 and under), you should always play with your child at all times. Interact with them, and show them what is appropriate and what is not okay. And at the very least, once your child knows what to do and what not to do, you should still supervise. Because messes like this aren't so fun:
With activities like this going on, I'm much less likely to flip on the TV (even just for background noise), and I'm so much more in tune with my toddler! I could watch her play with these sensory tubs for hours. The look in her eyes......I can't help but wonder what's going on in that little brain of hers!
So, I encourage you to be active with your kids. Challenge them mentally and physically, and you'll find yourself being more connected with them. And as I find more fun and interesting activities, I'll be sure to share them here!
Photobucket